DIY Glass Cloche Plus Display Tips
Today I’m going to show you a quick and easy DIY glass cloche project that you can make for less than the cost of a cup of coffee! It’s a very easy project that anyone can do and only takes a few minutes. I’m also sharing a few ideas for styling them, so hopefully you’ll find today’s post useful.
(On a different note, this is the first post I’ve published since updating my site! I have almost 11 years of content and have tried to make things super organized so you can find topics that interest you.
I still have a few things to update but it’s pretty much done. Feel free to browse around the new site and theme and let me know what you think! Visit my new home page here: HOME)
This fun little project is part of this month’s Thrifty Style Team challenge, hosted by my talented and beautiful friend Julie at Redhead Can Decorate. Once a month, our team of thrifty and creative bloggers shares ideas for crafting and decorating your home without spending a lot.

All of this month’s projects are at the bottom of the post so be sure to keep scrolling when you’re finished reading. There are some great ones this month, as always!
This post contains affiliate links for your convenience. I may make a small commission on products purchased with my link, but your price does not change. For full disclosure go here: Disclosure and Policies. Thank you for supporting my site.
How to style a glass cloche
Of course you can place whatever you want inside your cloche and style it as you wish, but here are just a few tips.
1. Use items with varying heights

Adding various, staggered heights always adds visual interest to any vignette or styled space. For this sweet vignette, I used an upsidedown vintage silver baby cup as a riser for the little blue bottle.
And I used a vintage metal spike flower frog to add height to the little floral notecard. You can stack the flower frogs to add more height if needed. The little teapot is the shortest item and sits in front of the others without blocking them from view.
Love vintage decor? See all my vintage decor posts here: Vintage Decorating Ideas
2. Spotlight a single item in a glass cloche

Our Lenten roses started blooming a couple of weeks ago and I’m so happy! They’re always the first sign that spring isn’t too far away.
For this look, I wanted to feature them in a little white marble bud vase. I added a few dried rose petals and a small rosebud around the base of the vase. And I can’t help but think of the movie “Beauty and the Beast” when I look at this. Now you are too, aren’t you?
See my favorite ways to use flowers in your home here: Decorating with Flowers
3. Fill the glass cloche with a collection
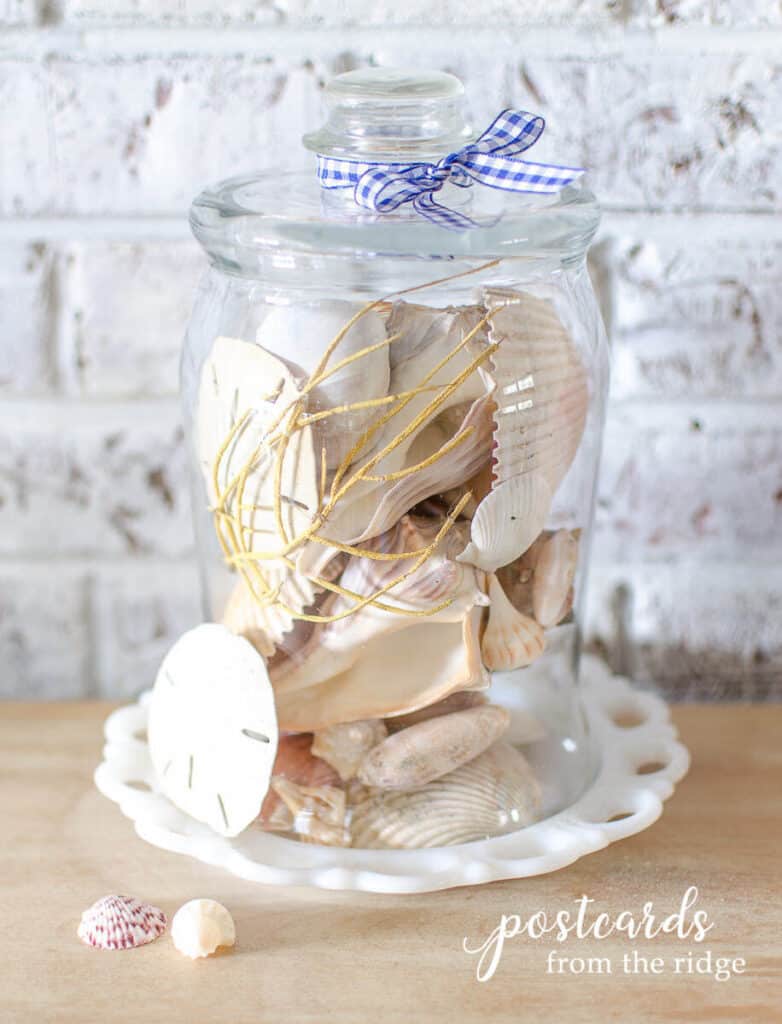
I always gather shells any time we visit the beach and have accumulated a nice collection! For this look, I held the cloche upside down and filled it up with shells. While it was still upside down, I placed the milk glass plate over the opening and then very slowly flipped it over so the plate was then on the bottom.
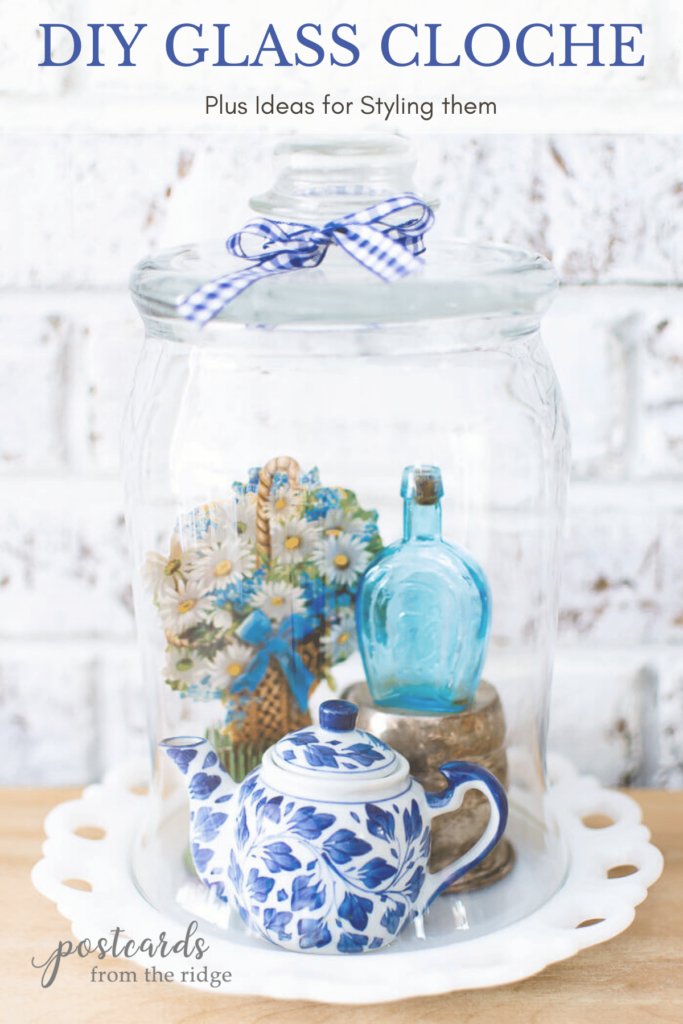
4. Color Coordinated Glass Cloche

For this look, I used one of my vintage blue bottles as a vase for the Lenten roses and added the little blue and white teapot. I’m really loving blues and bold colors these days and like the vivid colors here. If you love blue too, get some ideas for using it in your home here: 20 Fresh Ideas for Decorating with Blue and White
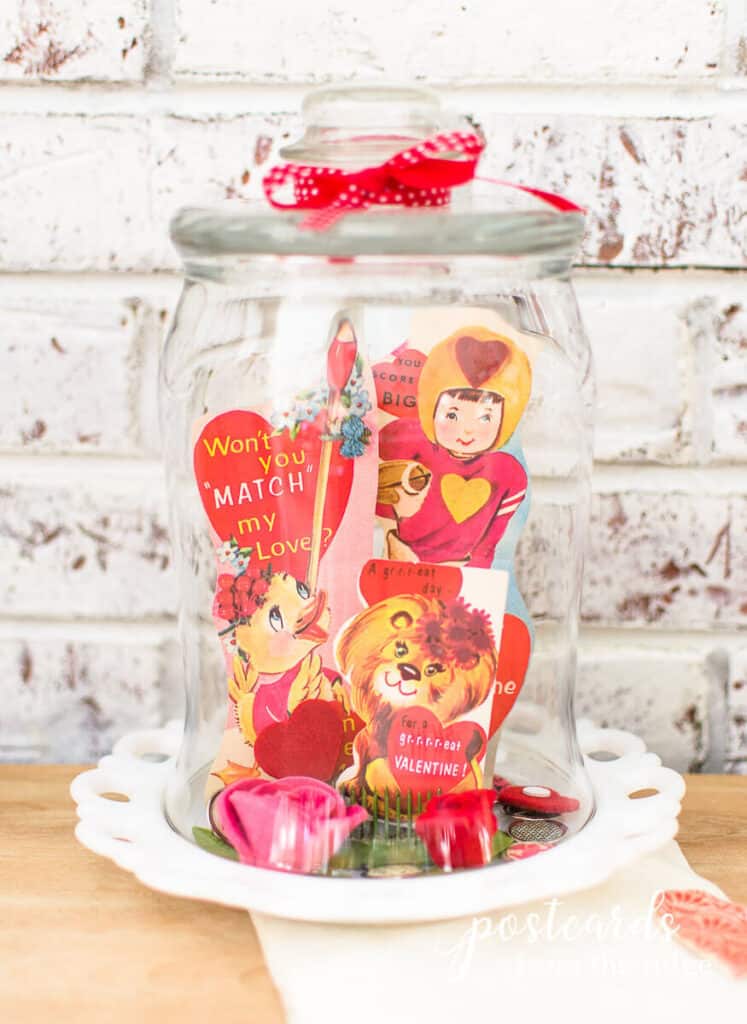
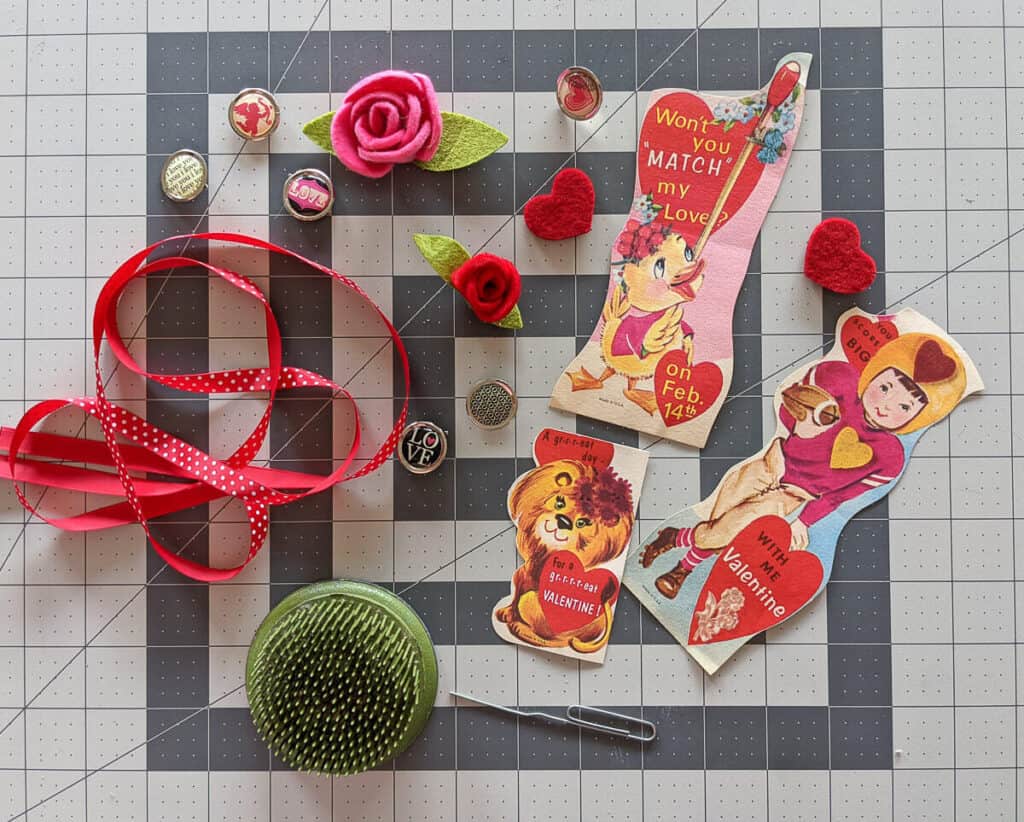
5. Display of Vintage Valentines
This little collection makes me smile every time I see it. We found these adorable vintage Valentines cards when we were going through some things from my husband’s family. It was such a sweet find. You can see another one of my favorite decorating projects with vintage Valentines here: A Paper Heart Garland and Vintage Decor for Valentine’s Day
NOTE: I actually created this cloche and vintage Valentines vignette a few weeks ago and was going to post it as part of the Lifestyle of Love vintage group that I’m in. But my daughter that moved to Minneapolis a few months ago broke her ankle pretty badly and needed me to come stay with her after surgery, so I’m posting it now. She’s doing much better and will be back to normal in a few months, hopefully!
Ideas for other items to display in your glass cloche
- Glass Christmas ornaments
- Small plants, herbs, and succulents
- Wine bottle corks
- Leaves, acorns, pine cones, and other fall decor
- Pillar Candle
- Vintage photographs and ephemera
- Whatever your heart desires
How to make a DIY glass cloche with a thrift store vase
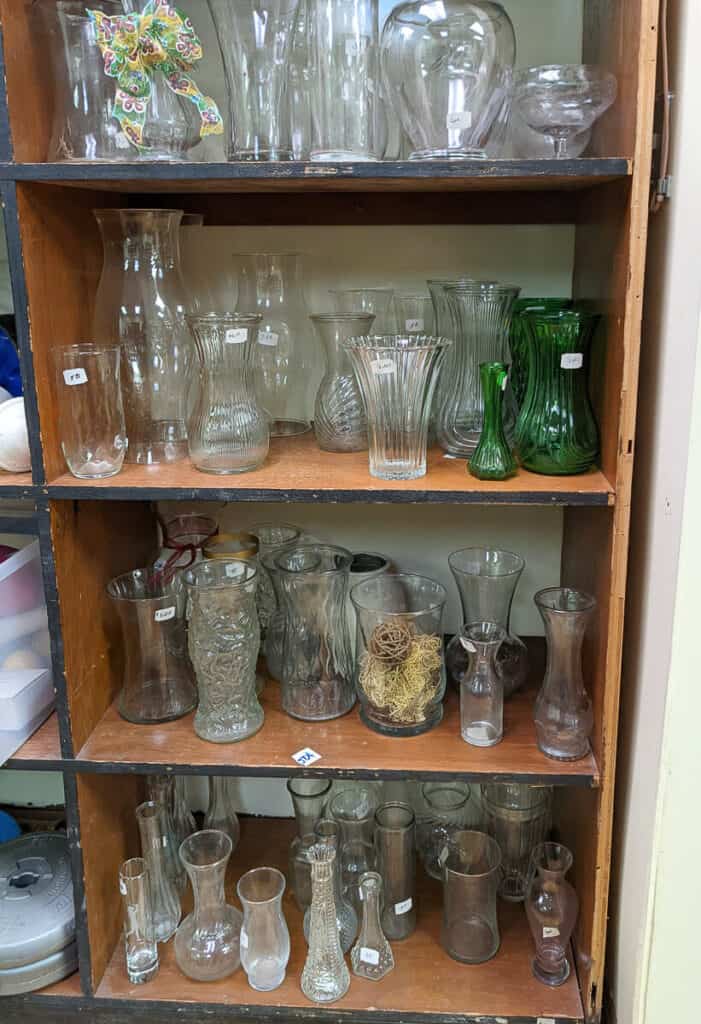
Now I’m going to show you how I made my glass cloche for $2! All it took was a trip to our local ReStore, some glue, and a little piece I stole from something I already had.
Here’s a glimpse at some of the vases I saw. They were all $1-2. The price was definitely right, but most of them didn’t have the shape I needed.
Except this one that was near the bottom. It’s fairly heavy and the shape is similar to some other bell cloches that I’ve seen before. For $2, I snagged it.

NOTE – Not all glass cloches are crazy expensive so if you can’t find the right size vase, a ready-made cloche won’t cost you too much. I found a similar one here: Glass Cloche
Supplies needed

All you really need is some good glue and something to be used as a handle. I tried a glass knob and it was too small. I considered a wooden ball, but didn’t really like the look of it. Then I saw a little glass jar candle on my kitchen island and stole the lid from it. Perfect!! (You can find these little candles at the Dollar Store or here: Small Glass Jar Candle)
Here’s what I used to make my DIY Glass Cloche:
- Glass vase from thrift shop or dollar store
- Glue
- Lid from small glass jar candle or other item to use as handle
- 3/8″ Ribbon (optional)
- Plate or pedestal to use for the base (I used a vintage milk glass plate from my stash)
And here’s all there is to making it:
1. Clean the glass vase
Wash the vase and lid thoroughly with glass cleaner, dish soap and hot water, or a vinegar and water mixture. Allow to dry.
2. Remove plastic seal from candle lid (optional)
I didn’t actually remove it because I knew I was going to add ribbon and it would cover it up. If you choose to remove it, you’ll need a utility knife and possibly some pliers. Be careful with the knife.
3. Apply adhesive
Carefully apply adhesive to the bottom of the candle lid. Try not to be as sloppy with it as I was.

4. Wipe excess glue
Using a rag, remove any excess glue that seeps out from applying the handle. Be sure to wipe it off before it dries. If you didn’t remove the plastic seal, you’ll want to cover it with ribbon or twine.

5. Add whatever tiny treasures you want to your DIY Glass Cloche
You likely won’t be able to add anything that’s over 3 or 4″ wide to your glass cloche, but that depends on the size vase that you use. Mine is somewhat small so I used narrow items.
I had a vintage milk glass plate that was the perfect size for the base of this cloche. You could probably use a salad plate or bread plate.
TIP: Using a vintage metal spike flower frog is is great way to display little cards.

Now that you see how I made my DIY glass cloche, you really should visit all of my Thrifty Style Team friends and see what they’re sharing this month. There are some great projects and tips!

Here are the links:
Redhead Can Decorate – Rose Petal Heart + 3 More Simple Romantic Ideas
Our Crafty Mom – Pinecone Fire Starters & Printable Gift Tag
I Should Be Mopping The Floor – 5 Last Minute Free Valentine’s Printables
DIY Beautify – Neutral Winter/Valentines Mantel Decorating Ideas
2 Bees In A Pod – Decorating with Milk Glass Vases
The How To Home – Dresser Makeover with Peel and Stick Wallpaper
Postcards From The Ridge – DIY Glass Cloche Plus Styling Tips
Vinyet Etc. – DIY Baby’s Breath Wreath
Sweet Pea – DIY Pompom Valentine’s Day Pillow
Lora B. Create & Ponder – Elegant Valentine’s Dessert Charcuterie
The Tattered Pew – Quick and Easy No Sew Curtain
Cottage On Bunker Hill – Textured Heart Wall Art
Amy Sadler Designs – How to make Leather Napkin Rings
You know I love a good cloche and these tips and ideas my friend are amazing, I love every detail!
Thank you, Laurie! That means a lot coming from you! I always love how you style your cloches.
I always enjoy seeing how you display your vintage finds, so many great ideas here, and your DIY cloche is genius!
I so much enjoyed all of your cloche decorating ideas. I’ve never thought about making my own cloche and I enjoyed learning how easy it is to turn a vase into a cloche.
Thank you, Paula! It’s such a quick and easy little project…my favorite kind!
Angie, the vintage Valentine’s bring me back…I wish I had saved all mine from when I was little!! I have a box of cards my Mom got at her baby shower for me that have this style of graphics that I love.
I hope your daughter is feeling better!!
Thanks, Jennifer! These little Valentine’s were such a happy find!
Angie – we too love creating glass cloche vignettes. Your displays are beautiful! Also, you new site is fabulous!
Glass cloches are so fun to decorate! And thank yo so much!
These are all so pretty and creative! I love the idea of using a vase as a cloche. Now I’ll be searching the thrift stores for one. I, too, just redid my blog, after almost 11 years, and I completely related to the comment in your newsletter about moving to a new town and speaking a new language. I moved from Blogger to WordPress. It was intense for a few weeks, learning!
Thanks, Pam. Moving my blog was something I’d been considering for a while. So far, so good, but I still have a lot to learn. Your site looks beautiful!! Thanks for dropping by and commenting.
Angie– your cloche ideas are wonderful…the vintage Valentines are my favorite, but I can’t resist that little blue and white tea pot, too! Such wonderful ideas. xoxo, kristi
Thanks, Kristi! That little teapot is a favorite of mine too! Such a sweet little item.
Great tips, Angie. Loved seeing all the options with their different color themes. And great DIY idea for creating your own thrifted version!
Thanks, Lora!! Nothing like saving some bucks and being creative at the same time!!
Hello! This is the first time to your blog and I’m SO in love with many of your posts!! We share much of the same interests in vintage decor and I’m thrilled to have found you. Thanks so much for sharing this easy cloche DIY!! It’s amazing!
Hi Rachel! I’m so happy you dropped by! I peeked at your blog and we definitely love the same things! So nice to meet another vintage fan!